
Hello, sandwich fans! It’s been awhile since I’ve written, but I have some fresh deli meat for you today. If you recall, last year I wrote a blog post about setting up VMware, Synology, and iSCSI MPIO. It turns out to have been my most-read post so far, for which I thank you. Since I’ve gotten such positive feedback, today I’m going to show you a similar setup, but this time I’m going to use NFS instead of iSCSI.
There are some pretty significant differences between iSCSI and NFS, both in terms of architecture and performance. One big difference is that NFS really doesn’t have support for multi-pathing (MPIO) in the way that iSCSI does. It has a few work-arounds like using alternate subnets and so forth, but for today we’re going to rely on simple failover on the host side with LACP link bonding on the storage side. Later on, we’ll compare the performance to the iSCSI system we built last year.
Note that we’ll be using VMware 5.5, which only has support for NFS 3. If you need NFS 4, you’ll need to use VMware version 6.
The setup is similar to the iSCSI one, although the hardware is somewhat newer. We’re still using two HP servers with two storage NICs, one Cisco layer 2 switch (a 2960-X this time, instead of a 2960), and a Synology RS2414+. We’ll also be using four storage drives instead of three. It’s possible that the extra spindle may skew the numbers, but I think we can all agree that this is not a scientific study, right? On to the fun!
So, a couple of pieces of work to do first: Synology only recently introduced NFS support for VAAI primitives in their DSM software (specifically, Full File Clone and Reserve Space), so you’ll want to make sure you’re on at least DSM 5.1-5004. You’ll also want to download the Synology NFS Plug-in for VMware VAAI from Synology’s website. You can find it on the Downloads page for your storage unit. I’ll show you how to install it a little later in this post.
First, let’s configure the storage to do LACP. On the Synology, open up the Control Panel – Network – Network Interface. You’ll see here that I have four live network connections. LAN1-3 will be our storage traffic plugged into our storage switch, and LAN4 will be our management interface, plugged into our management network.

Click on the Create button and, doing your best Ian Fleming impression, I want you to Create Bond. You’ll select IEEE802.3ad Dynamic Link Aggregation. Select your interfaces to add to the group, then select your IP addressing (Static or DHCP). Make sure you set your Jumbo Frames and MTU here, if you’re using it.

Here, I’m using DHCP for the moment. You’ll want statically assigned addresses, most likely.
Hit apply, then go back to the Network Interfaces screen to check your work.

Sweet.
Next, let’s go to our switch and configure the port channel.

Mmm…Cisco-ey
In the image above, you can see the three ports I’ve assigned to the port channel, and the channel group itself. You may or may not need the vlan membership, depending on your environment. We add nonegotiate so it doesn’t try negotiate trunk mode, and portfast to bring the port up as quickly as possible.
We also want to set global MTU with:
(config)# system mtu jumbo 9000

Port channel and MTU
In the above image, we can see that all three ports are bundled in the port channel (P), and that the port channel is in use (U). We can also verify that jumbo frames are configured.
Now that our storage-side networking is done, let’s create an NFS file store to present to the hosts.
Go back to the Synology and open the Control Panel – File Services – Win/Mac/NFS. I’ve turned off Windows and Mac file sharing. NFS is disabled by default, so enable it here. Remember that VMware 5.x does not support NFS4, so don’t bother enabling it unless you’re using VMware 6 or later. Migrating from NFS3 to NFS4 is outside the scope of this document.

Next, go to Control Panel – Shared Folders and create your file share. It should have a descriptive name but you can add a description as well. I also recommend checking the two “Hide” folders as well. We’ll be adding security later but there’s no reason to let anyone see your shares.

On the Permissions tab, make sure only authorized users have access to the share (in this case, Admin only).
 Then, on the NFS Permissions tab, create a permission for each ESXi host that will access the store. You’ll use the IP address of the vmkernel port for that host’s storage network. Selecting address ranges or hostnames (if you have DNS configured) seems to be a little flaky, so I prefer to have individual addresses defined. Also, remember that VMware requires “No Root Squash” on NFS connections, so be sure to leave Squash set to “No Mapping”.
Be sure to make note of the mount path as you’ll need it for the VMware side of things. In this case, you can see it partially obscured in the lower left of the image below.
 That’s it for the storage side of the equation. On to the VMware side!
A few considerations to note first:
First, there’s no way to pin an NFS session to a particular vmkernel. The host will try to find a VMkernel port that is on the same subnet as the NFS server. If there are more than one, it uses the first one found. If it can’t find one, it will traverse the management vmkernel via the default gateway. This means you’ll definitely want to have your storage-side NICs on the same subnet as your storage unless you start doing complex configurations. I’ll leave that explanation to the likes of Mr. Wahl.
Second, for an installation this small, there’s no good way to load balance across multiple storage links. The best we can do is high availability. NFS will only use the first link in a pair. If you have Enterprise Plus licensing, you can do LACP and multiple IP’s which will give you some semblance of load balancing, but we’re not covering that here in our little two server, single storage switch build. I should note that NFS4 (supported in VMware 6.x) has session trunking (multipathing) and so that may be a consideration for you when choosing your implementation.
Third, we want to make sure our mount points are the same on each host. If there is any deviation, the hosts will see them as different storage points which will cause things like vMotion to fail, so don’t mix and match IP’s and FQDN’s. Pick one and stick with it.
As before, we’ll be using the fat client since this is still in build phase and I don’t have the vCenter Server ready yet.
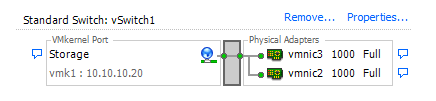
On my host, I’ve created a separate vswitch with my two storage network nics. There is no NIC teaming or special configuration. However, on the properties for the vswitch, under NIC teaming, I set Failback to “No”. This will help prevent port flapping if there is some intermittent network issue.
Also, if using Jumbo Frames, DON’T FORGET TO SET YOUR MTU! I forgot to do it when I was writing this. Luckily, I remembered long enough to shout at you to cover my embarrassment. Remember to set MTU on both the vSwitch and the interfaces.

Now, let’s create our datastore mount point. Go to Storage and Add Storage. We’re going to choose Network File System.


I prefer to use the same datastore name in VMware as I do on the storage system so that I can keep track of them more easily.
Click to finish and we’re done! Easy, right? Not so fast, there, buckaroo! Check out this screenshot:

Unsupported?! Oh NOES!!!
You see where it says Hardware Acceleration is unsupported? Remember the NFS plugin for VAAI that we talked about? That’s right. It’s time. I’m assuming you downloaded it already like we discussed.
There are a couple of ways to install this. You can even use VUM if you want. However, since this build is still in its infancy, we’re going to use ESXCLI. Now, we only get support for two VAAI primitives under NFS here, Full File Clone and Reserve Space, but they will offload cloning tasks to your storage and allow you to thick provision. We definitely want the driver installed. Remember that it must be installed on each host connected to this storage.
Upload the .vib file to someplace accessible by the hosts. In this case, I just SCP’ed it to the /tmp directory of the host I’m working on, but you could add it to shared storage, too.
The command to load the .vib is:
esxcli software vib install -v /path to vib/vib-name.vib
Our .vib is called Synology_bootbank_esx-nfsplugin_1.0-1.vib (because I extracted it out of the .zip bundle. The .vib-only download is just called esx-nfsplugin.vib), so here’s what it looks like:
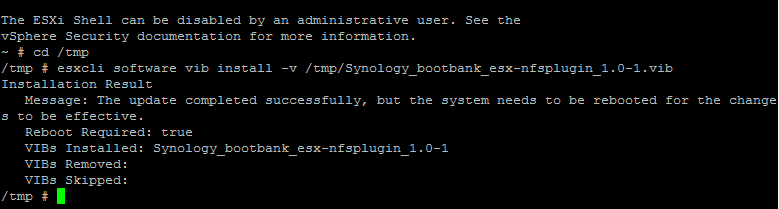
Naturally, we need a reboot, because why not? Who doesn’t love constantly rebooting things? I’m rebooting at least eight things RIGHT NOW while eating my delicious sandwich.
Ok, we’re back from our reboot. Let’s see if the .vib is installed:
![]()
Yep, right where we left it. Excellent. But let’s also see if we have hardware acceleration, too.

Oh, thank god! It worked. What a relief!
Hardware acceleration is now supported! For further information and tweaking, I highly recommend carefully reading Best Practices for Running VMware vSphere on Network-Attached Storage (NAS).
That’s all the time we have for today. In my next post, I’ll do another I/O analysis for this build like I did for the iSCSI connection.
8 thoughts on “How to set up VMware ESXi, a Synology NFS NAS, and Failover Storage Networking”
Comments are closed.

Hello,
In this configuration NFS, the link between vmware & synology is 2 Gigas or 1 Giga ?
Thanks a lot in advance for your response.
Nicit
In this example, we’re using 2x1Gb links for high availability, not two links bonded into a single 2Gb channel. NFS3 doesn’t support multipathing or load balancing without doing some network tricks that are outside the scope of this document. As noted, if you have E+ licensing, you can do LACP to bond your uplinks, or if you are at 6.x you may be able to use NFS4 which does support multipathing.
Nice article. Thanks for sharing!
Any thoughts on how to setup up a second Synology NAS to sync datastores for redundancy / backup?
I have ESXi 6 running on a MacMini connected to datastore on a Synology DS212j.
I am not wanting real-time failover, just redundancy to get back up in hours instead of days.
Synology does have some built-in tools for data backup and replication. It’s not really designed for any sort of high-availability (it’s still just a NAS, not a SAN), so you’d have to experiment to make sure there’s no corruption or data loss, plus you’d almost certainly have to manually fail it over to the backup unit.
Do you have any pointers to building a low cost SAN?
Hi, I guess Hardware Acceleration is not working in my lab. I did installed syno plugin on each ESXi host and it shows up under vib list. The NFS datastore shows Hardware acceleration = supported. I have a template which is on “VAAI-NFS” datastore and upon using “deploy vm from template” with destination datastore same i.e., “VAAI-NFS”, the task complete after 6-8 mins. where did I go wrong? any config I might have missed?
I’m not sure I understand the problem. I don’t know anything about your particular setup, but 6-8 minutes to deploy a VM from a template doesn’t seem unreasonable to me. Even with hardware acceleration, you’re still copying gigabytes of data. It’s not instantaneous.