Did you miss Part 1? Find it here!
Welcome back, VR lovers! When last we spoke, I was sourcing parts for Holodeck, the PC that would drive my HTC Vive. You can read more about it here. Today, I’m going to speak a little bit more about the actual build.
I wanted a PC that was both cutting-edge and compact. I decided to give ASRock a try for the mini-ITX motherboard. The first board I received from Amazon was a used one that someone else had returned. The CPU bracket was gouged up and the powder coat had been scratched off. The whole thing was covered in thermal paste and it was packed in a kitchen Zip-Loc bag. Clearly, the guy who returned it had no idea how to install a motherboard. Needless to say, I wasn’t interested in a dodgy motherboard that had been packed in a regular static-generating plastic bag (it was even missing the back plate). I returned it to Amazon and had a brand new one in my hands two days later. I was a little disappointed since I had planned to build it over the weekend, but whaddaya gonna do?
I’ve always been partial to ASUS but decided to give ASRock a try after doing some shopping around. I really like this motherboard. The feature set on the UEFI BIOS is pretty complete, even including things like a “Dehumidifier mode” that will occasionally spin up the fans when the PC is shut down or in standby. I also like the layout, with most of the headers along the trailing edge. I did have a couple of minor issues with the placement of a few headers, though. I’ll talk about that a little bit in a minute.
Corsair has always been good to me. I’ve used their memory sticks extensively and had very few problems with them, so I had no reservations about trying out their case, water cooler, and power supply.

Corsair Obsidian 250D Mini ITX Case with access panels removed. Note the removable tray under the power supply for easy dust filter cleaning.
As you can see, it’s a very basic case. It’s a plain black cube without a bunch of weird plastic tacked on and no odd angles but the all-metal construction is light, yet sturdy. All of the panels are attached via thumbscrews and slide tabs and everything is extremely accessible. There are a number of zip-tie tabs throughout the interior for keeping cables tied down and managed. The side panels, front fan, and even the bottom exhause for the power supply all have easily removable dust filters for easy cleaning. For a small case, it was a dream to work with.
As you can see, there isn’t a lot of room to work with in there, though. Even with the cable tie-downs, by the time you get all of the power rails, fan cables, SATA, and everything else, that front section starts to get pretty crowded. I wrapped and tied them as best I could so the air flow on the fan isn’t restricted, but it’s not as neat and clean as I’d like. Most of the cables included with the components are just too long, or have connectors in odd places. For example, the included SATA cables each supported either two or three SATA drives, which meant one or two extra connectors plus included cable length that I had to figure out where to put. I would have liked some shorter, single-purpose cables.
The onboard systems included two front-mounted USB 3.0 ports, audio out, and a mic port. The audio includes an HD audio connector for compatible motherboards. On mine, the HD Audio header is just in front of the PCI-E slot, which made cable routing a little difficult. I would have preferred the header on the back with the rest of the connectors.
I’d like to talk a little bit about small cases and installing parts. I really had to think ahead on this one and plan the order in which parts would get installed and their orientation. The first problem I noticed wasn’t until I went to do a location check for the radiator. I learned that the memory needed to be installed first since the locking tabs for the memory sticks cannot be opened when the radiator fans are in place. This means I will need to remove the radiator if I ever need to replace a memory stick.
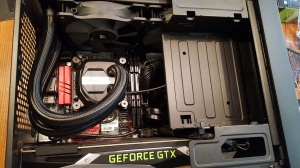
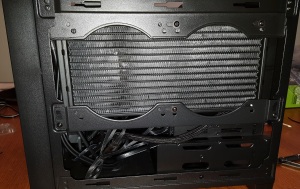
Next, I learned that the water cooler supply hoses are inconveniently placed, regardless of whether the radiator is installed as shown or with the hoses to the front. In the front, the front case fan is in the way. In the back, the 12v CPU header and the CPU fan header are in the way. In fact, as I was trying to line up the holes for the radiator, I realized that the lower screw head on the fan was actually making contact with the fourth pin on the fan header and I ended up bending it. After fixing that, I realized I had to install the fan cable and CPU power cable, and then situate the radiator as far forward as possible to leave adequate room. I also had to smoosh the 12v power rail cables down as far as I could to leave enough clearance. This made for a very tight squeeze. I was able to route all of the wires on that side under the radiator fans, though.
If I had a recommendation for Corsair, it would be to widen the case just slightly or narrow the thickness of the radiator. Everything fit but because the radiator was so far forward the holes didn’t properly line up, so while it’s adequately attached, it’s not as adequately attached as I’d prefer.

12v CPU and CPU fan headers. Note the fourth pin (circled in blue) still bent slightly, but not contacting the screw holding the fan.
Lastly, I had to think about how to orient the hoses. Because the case is so small, the CPU is practically touching the radiator fans. In this particular configuration, there’s really only one orientation. Because of the heat sink to the left, the memory to the right, and the fans on top, I had to orient the cooling head with the hoses to the right. At the bottom of the cooling head is a USB connector that you plug into a USB header on the motherboard that allows you to control the cooling system and LEDs through software. Orienting the cooling head this way is the only way to provide adequate clearance for the wire coming out of it as well as coil the hoses enough that they’re not kinked or sticking out the top.
Last, but most important of all, the installation of the power supply and the video card. As I discussed last week, the video card issue was one I struggled with. I ultimately decided on the EVGA Founder’s Edition of the NVidia GTX1080 card, but the one I wanted was a step or two up. One issue that this card may have is cooling. The fan draws in air through the side panel and exhausts it out the rear. At full power in VR, this card generates a LOT of heat. Enough that I felt I needed to remove the top panel from the PC. I oriented the CPU water cooler fans to exhaust through the radiator (blowing out), but I may have to reverse them to draw cool air into the case. The gaming models from EVGA will have ACX3.0 cooling, so they may be a lot more heat-efficient but they’re not available yet.
With everything assembled, I powered it on for the first time. I’ve never used a water cooler before, and the whole system was so silent that I couldn’t be sure it was running. All of the (silent) fans were spinning, so I knew it was getting power, but I wasn’t getting any video output, either, because the motherboard automatically switched over to the PCI card for video. The onboard HDMI (to which my monitor was connected) was disabled. With no onboard speaker (for beep codes), no fan noise, and no video, it took me a few minutes to figure out that the thing was working just fine.
All of the fans are adjustable either manually or automatically through both the BIOS and through Windows software. ASRock has some nice power profiles that will spin the fans up faster as the system reaches pre-defined temperature thresholds, which is good because this thing seems to get pretty tropical. All in all, I’ve been extremely satisfied with the results of this build.
Stay tuned for the next installment wherein we’ll talk about Virtual Reality!

First time experiencing room-scale Virtual Reality!


2 thoughts on “HTC Vive Holodeck PC – Part 2”
Comments are closed.